LAMP平台的搭建1.docx
《LAMP平台的搭建1.docx》由会员分享,可在线阅读,更多相关《LAMP平台的搭建1.docx(13页珍藏版)》请在冰豆网上搜索。

LAMP平台的搭建1
LAMP平台的搭建步骤
一、安装tools
1cd/media/Vmware\tools/切换到tools目录中;
2ll
3tarzxfVmwaretools-10.0.0-2977863.tar.gz-c/usr/src/把tools解压到、usr/src/目录中;
4cd/usr/src/vmware-tools-distrib/切换到、usr/sre/目录中;
5ll
6./vmware-install.real.pl执行安装tools;
7init6重启虚拟机;
二、关闭防火墙
chkconfigiptablesoff关闭防火墙
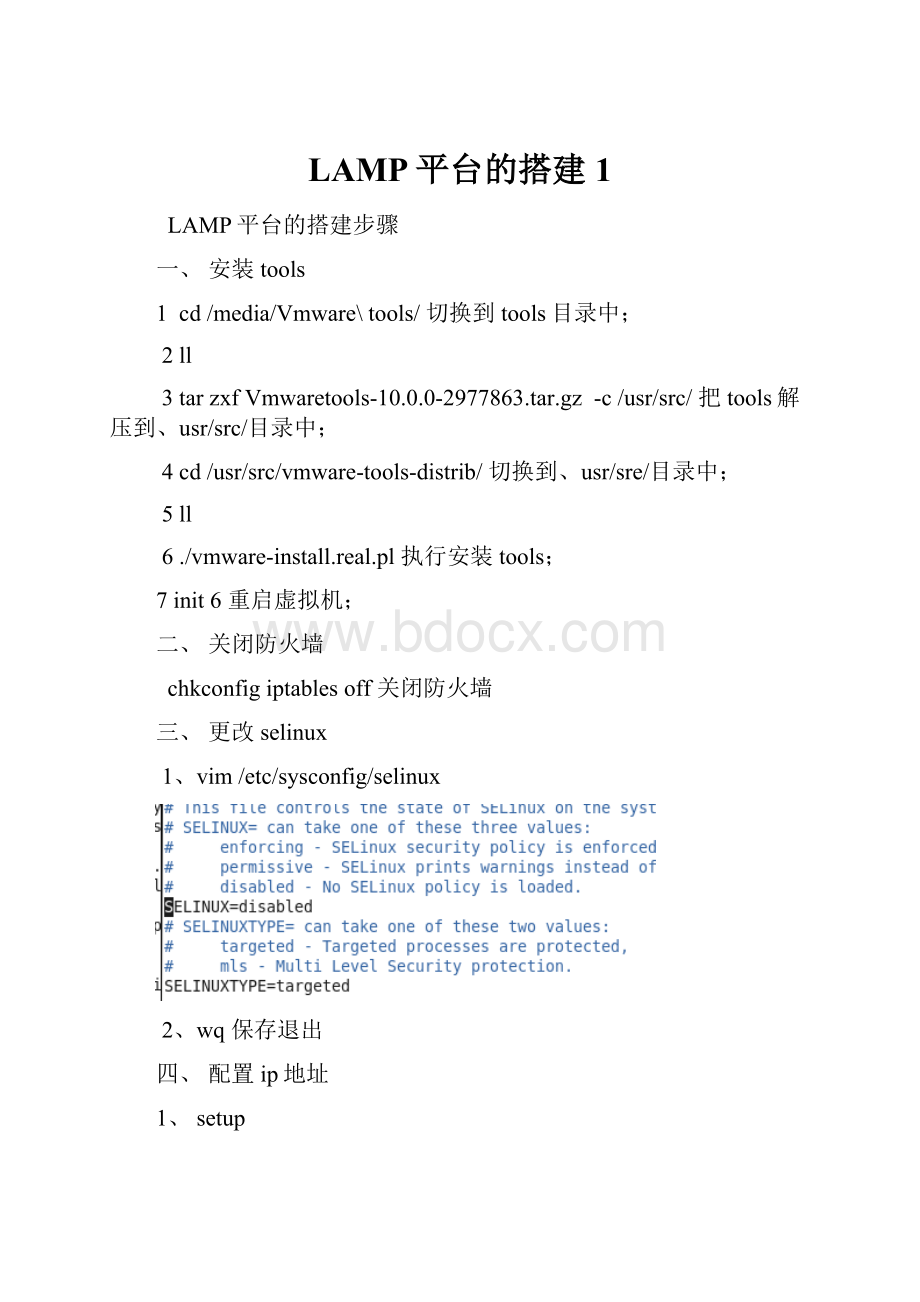
三、更改selinux
1、vim/etc/sysconfig/selinux
2、wq保存退出
四、配置ip地址
1、setup
2、ifconfig查看网络配置有没有生效如果没有生效用:
ifupeth0启动
五、安装yum;
1、mkdir/mnt/cdrom创建一个文件夹
2、mount/dev/cdrom/mnt/cdrom/把光盘挂载到文件夹上
3、vim/etc/yum.repos.d/rhel-source.repo更改etc/yum.repos.d/rhel-source.repo中的配置
4、yumclearall清除yum中的所有缓存,有的可以不用这命令也好用
5、yum-yinstallgcc*用yum安装gcc环境*代表安装所有的
六、安装与配置Apache服务器
1、rpm-ehttpdhttpd-manualwebalizersubversionmod_pythonmod_sslmod_perlsystem-config-httpdphpphp-cliphp-ldapphp-commonmysqldovecot–nodeps卸载httpd及相关依赖包
2、cdabc我把我的软件包放在abc文件夹中
3、ll查看abc文件夹中的软件包
3、tarzxfhttpd-2.2.15.tar.gz-c/usr/src/把httpd软件包解压到usr/src中
4、cd/usr/src/httpd-2.2.15/切换到usr/src目录中
5、./configureprefix=/usr/local/httpd--enable-so--enable-rewrite--enable-charset-lite--enable-cgi配置且执行服务
5、make用make与makeinstall编译安装
6、makeinstall
7、ls/usr/local/httpd确认安装结果
8、ln-s/usr/local/httpd/bin/*/usr/local/bin/优化执行路径
ls-l/usr/local/bin/httpd/usr/local/bin/apachectl
9、cp/usr/local/httpd/bin/apachectl/etc/init.d/httpd添加httpd系统服务,以便通过chkconfig进行管理
10、vim/etc/init.d/httpd打开配置文件,在配置文件中加入下面两行
11、chkconfig--addhttpd添加httpd服务
12、chkconfig--listhttpd
13、chkconfig--level35httpdon如果12中3/5都是关闭,则用此命令开启3/5;
14、httpd的目录结构和文件
服务目录:
/usr/local/httpd/
主配置文件:
/usr/local/httpd/conf/httpd.conf
网页目录:
/usr/local/httpd/htdocs/
服务脚本:
/usr/local/httpd/bin/apachectl
执行程序:
/usr/local/httpd/bin/httpd
访问日志:
/usr/local/httpd/log/access_log
错误日志:
/usr/local/httpd/log/error_log
15、vi/usr/local/httpd/conf/httpd.conf配置Apache服务器
16、/etc/init.d/httpdstart启动服务器
17、cat/usr/local/httpd/htdocs/index.html查看部署网页文档
18、vim/usr/local/httpd/htdocs/index.html编辑网页部署文档
19、servicehttpdrestart重启服务器
20、在浏览器中输入或者192.168.2.1是时,出现如下界面,说明Apache服务器搭建完成。
七、安装与配置MySQL服务器
1、确认没有使用RPM方式安装mysql-server、mysql
2、安装光盘中自带的下面这个包
rpm-ivh/media/RHEL_6.5\x86_64\Disc\1/Packages/ncurses-devel-5.7-3.20090208.el6.x86_64.rpm
2、安装cmake包,命令如下截图
3、MySQL的编译安装
groupaddmysql
useradd-M-s/sbin/nologinmysql-gmysql
cdabc
tarzxfmysql-5.0.56.tar.gz-C/usr/src/
cd/usr/src/mysql-5.0.56/
cmake-DCMAKE_INSTALL_PREFIX=/usr/local/mysql-DSYSCONFDIR=/etc-DDEFAULT_CHARSET=utf8-DDEFAULT_COLLATION=utf8_general_ci-DWITH_EXTRA_CHARSETS=all
make
makeinstall
4、.安装后的其他调整
chown-Rmysql:
mysql/usr/local/mysqlG改变MySQL的所属组和主
cpsupport-files/my-f/etc/f复制文件
/usr/local/mysql/scripts/mysql_install_db--user=mysql--basedir=/usr/local/mysql--datadir=/usr/local/mysql/data/--force记得加-force不然会出错
echo"PATH=$PATH:
/usr/local/mysql/bin">>/etc/profile
./etc/profile
cpsupport-files/mysql.server/etc/rc.d/init.d/mysqld
chmod+x/etc/rc.d/init.d/mysqld增加权限
chkconfig--addmysqld添加服务
chkconfig--listmysqld查看服务
servicemysqldstart
etc/init.d/mysqldstatus启动服务
netstat-anpt|grepmysqld查看端口
mysql-uroot登录数据库,-u为指定用户
mysqladmin-uroot[-p]passwordredhat设置密码
7、依照以上命令安装数据库后,如果成功了就可以登录到数据库中
八、php的安装
1、安装扩展工具库
数据加密工具libmcrypt、mhash、mcrypt
Cdabc到abc文件夹中解压这三个包到usr/sre中
tarzxfmhash-0.9.9.9.tar.gz-C/usr/src/
tarzxflibmcrypt-2.5.8.tar.gz-C/usr/src/
tarzxfmcrypt-2.6.8.tar.gz-C/usr/src/
cd/usr/src/libmcrypt-2.5.8/
./configure
make&&makeinstall
ln-s/usr/local/lib/libmcrypt.*/usr/lib/
cd/usr/src/mhash-0.9.9.9
./configure
make&&makeinstall
ln-s/usr/local/lib/libmhash*/usr/lib/
cd/usr/src/mcrypt-2.6.8
exportLD_LIBRARY_PATH=/usr/local/lib
:
$LD_LIBRARY_PATH
./configure
]#make&&makeinstall
2.安装php
Cdabc
tarzxfphp-5.2.6.tar.gz-C/usr/src/
cd/usr/src/php-5.2.6
./configure--prefix=/usr/local/php5--with-mcrypt--with-apxs2=/usr/local/httpd/bin/apxs--with-mysql=/usr/local/mysql--with-config-file-path=/usr/local/php5--enable-mbstring
Make
makeinstall
cp/usr/src/php-5.2.6/php.ini-development/usr/local/php5/php.ini复制样列文件
grep-v"^;"/usr/local/php5/php.ini|grep-v"^$"[PHP]
vi/usr/local/php5/php.ini修改配置选项,在配置文件中添加以下内容,
Cdabc
tarzxfZendGuardLoader-php-5.3-linux-glibc23-x86_64.tar.gz-C/usr/src/添加优化模块
cd/usr/src/ZendGuardLoader-php-5.3-linux-glibc23-x86_64/php-5.3.x/
cpZendGuardLoader.so/usr/local/php5/lib/php
vi/usr/local/php5/php.ini
3、2.httpd.conf配置调整,使httpd服务器支持PHP页面解析功能
vi/usr/local/httpd/conf/httpd.conf在httpd的配置文件中添加php程序模块,使支持php网页文件
vim/usr/local/httpd/htdocs/test1.php添加php网页为test1.php
usr/local/httpd/bin/apachectlrestart重新启动httpd
在浏览器中输入192.168.2.1/test1.php,回车后出现下面页面,则php搭建成功
4、2.测试PHP网页能否访问MySQL数据库
vi/usr/local/httpd/htdocs/test2.php
php
$link=mysql_connect('localhost','root','123456');
if($link)echo"恭喜你,数据库连接成功啦!
!
";
mysql_close();
?
>