MPLS VPN GNS3完成实验.docx
《MPLS VPN GNS3完成实验.docx》由会员分享,可在线阅读,更多相关《MPLS VPN GNS3完成实验.docx(13页珍藏版)》请在冰豆网上搜索。
MPLSVPNGNS3完成实验
MPLSVPNGNS3完成实验
实验目的:
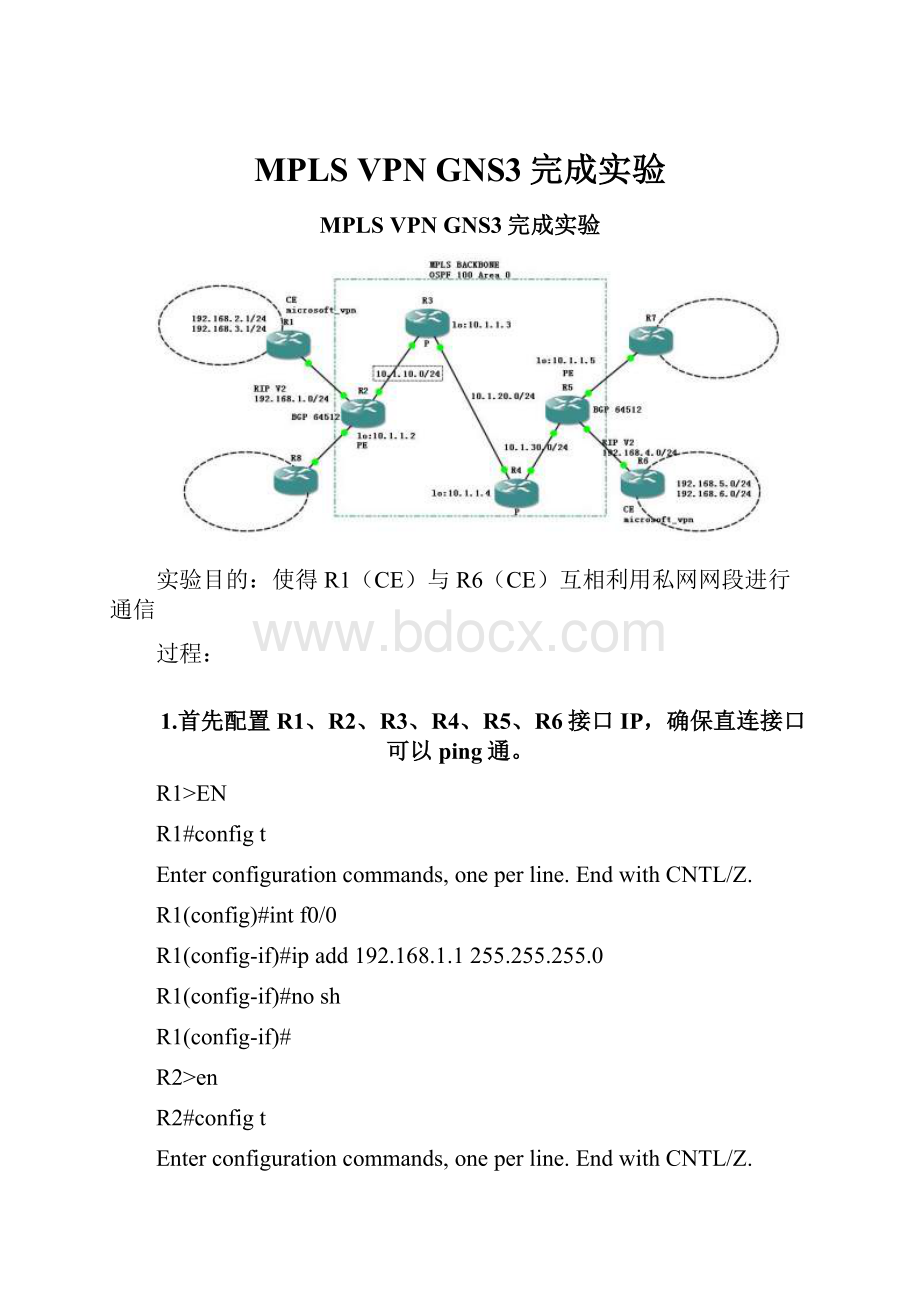
使得R1(CE)与R6(CE)互相利用私网网段进行通信
过程:
1.首先配置R1、R2、R3、R4、R5、R6接口IP,确保直连接口可以ping通。
R1>EN
R1#configt
Enterconfigurationcommands,oneperline.EndwithCNTL/Z.
R1(config)#intf0/0
R1(config-if)#ipadd192.168.1.1255.255.255.0
R1(config-if)#nosh
R1(config-if)#
R2>en
R2#configt
Enterconfigurationcommands,oneperline.EndwithCNTL/Z.
R2(config)#intf0/0
R2(config-if)#ipadd192.168.1.2255.255.255.0
R2(config-if)#nosh
R2(config-if)#intf0/1
R2(config-if)#ipadd10.1.10.1255.255.255.0
R2(config-if)#nosh
R2(config-if)#
R3>en
R3#configt
Enterconfigurationcommands,oneperline.EndwithCNTL/Z.
R3(config)#intf0/0
R3(config-if)#ipadd10.1.10.2255.255.255.0
R3(config-if)#nosh
R3(config-if)#intf0/1
R3(config-if)#ipadd10.1.20.1255.255.255.0
R3(config-if)#nosh
R3(config-if)#
R4>en
R4#configt
Enterconfigurationcommands,oneperline.EndwithCNTL/Z.
R4(config)#intf0/0
R4(config-if)#ipadd10.1.20.2255.255.255.0
R4(config-if)#nosh
R4(config-if)#intf0/1
R4(config-if)#ipadd10.1.30.1255.255.255.0
R4(config-if)#nosh
R4(config-if)#
R5>en
R5#configt
Enterconfigurationcommands,oneperline.EndwithCNTL/Z.
R5(config)#intf0/0
R5(config-if)#ipadd10.1.30.2255.255.255.0
R5(config-if)#nosh
R5(config-if)#intf0/1
R5(config-if)#ipadd192.168.4.1255.255.255.0
R5(config-if)#nosh
R5(config-if)#
R6>en
R6#configt
Enterconfigurationcommands,oneperline.EndwithCNTL/Z.
R6(config)#intf0/0
R6(config-if)#ipadd192.168.4.2255.255.255.0
R6(config-if)#nosh
R6(config-if)#
2.配置MPLSBACKBONE的IGP路由器,本实验采用ospf(一般ISP使用IS-IS)
R2:
interfaceLoopback0
ipaddress10.1.1.2255.255.255.255
routerospf100
router-id10.1.1.2
passive-interfaceLoopback0
network10.0.0.00.255.255.255area0
R3:
interfaceLoopback0
ipaddress10.1.1.3 255.255.255.255
routerospf100
router-id10.1.1.3
passive-interfaceLoopback0
network10.0.0.00.255.255.255area0
R4:
interfaceLoopback0
ipaddress10.1.1.4 255.255.255.255
routerospf100
router-id10.1.1.4
passive-interfaceLoopback0
network10.0.0.00.255.255.255area0
R5:
interfaceLoopback0
ipaddress10.1.1.5 255.255.255.255
routerospf100
router-id10.1.1.5
passive-interfaceLoopback0
network10.0.0.00.255.255.255area0
3.查看MPLS骨干网路由表,确认IGP是否正常工作
R2#showiprouteospf
10.0.0.0/8isvariablysubnetted,7subnets,2masks
O 10.1.1.3/32[110/2]via10.1.10.2,01:
48:
47,FastEthernet1/0
O 10.1.1.4/32[110/3]via10.1.10.2,01:
48:
47,FastEthernet1/0
O 10.1.1.5/32[110/4]via10.1.10.2,01:
48:
47,FastEthernet1/0
O 10.1.30.0/24[110/3]via10.1.10.2,01:
48:
47,FastEthernet1/0
O 10.1.20.0/24[110/2]via10.1.10.2,01:
48:
47,FastEthernet1/0
4.配置PE路由器(R2和R5)的MPLS
R2:
ipcef //启用CEF
mplslabelprotocolldp //选择LDP标签
mplsldprouter-idLoopback0force //选择使用回环口作为LSR的router-id
interfaceFastEthernet1/0 //为端口启用MPLS的标签转发
mplsip
tag-switchingip
R5:
ipcef
mplslabelprotocolldp
mplsldprouter-idLoopback0force
interfaceFastEthernet0/0
mplsip
tag-switchingip
5.配置骨干路由器P(R3,R4)的MPLS
R3:
ipcef
mplslabelprotocolldp
mplsldprouter-idLoopback0force
!
interfaceFastEthernet0/0
mplsip
tag-switchingip
!
interfaceFastEthernet1/0
mplsip
tag-switchingip
R4:
ipcef
mplslabelprotocolldp
mplsldprouter-idLoopback0force
!
interfaceFastEthernet0/0
mplsip
tag-switchingip
!
interfaceFastEthernet1/0
mplsip
tag-switchingip
6.在任意一台MPLS骨干路由器查看FLIB(标签转发表),确认MPLS正常工作
R2#showmplsforwarding-table
Local Outgoing Prefix Bytestag Outgoing NextHop
tag tagorVC orTunnelId switched interface
16 Poptag 10.1.1.3/32 0 Fa1/0 10.1.10.2
17 17 10.1.1.4/32 0 Fa1/0 10.1.10.2
18 18 10.1.1.5/32 0 Fa1/0 10.1.10.2
19 19 10.1.30.0/24 0 Fa1/0 10.1.10.2
20 Poptag 10.1.20.0/24 0 Fa1/0 10.1.10.2
7.在两台PE上配置BGP协议。
配置BGP协议是为了启用MP-BGP,用于在PE路由器之间交换VPN路由。
由于BGP创建邻居时,不要求对等体物理直连,因此BGP使用tcp179端口进行邻居的会话
R2#showtcpbrief
TCB LocalAddress ForeignAddress (state)
64FEB8A8 10.1.1.2.179 10.1.1.5.23290 ESTAB
64E44B50 10.1.1.2.646 10.1.1.3.18999 ESTAB
因此这里只需配置R2与R5路由器的BGP协议。
R2(config)#routerbgp64512//64512是私有AS(64512-65535)
R2(config-router)#neighbor10.1.1.5remote-as64512
R2(config-router)#neighbor10.1.1.5update-sourceloopback0
R2(config-router)#nosynchronization
R2(config-router)#noauo-summary
关闭自动汇总,是为确保重分布到BGP的路由不会在主网络边界被汇总
R5(config)#routerbgp64512
R5(config-router)#neighbor10.1.1.2remote-as64512
R5(config-router)#neighbor10.1.1.2 update-sourceloopback0
R5(cconfig-router)#nosynchronization
R5(config-router)#noauo-summary
8.确认BGP的邻居创建成功
R2#SHOWIPBGpSUmmary
BGProuteridentifier10.1.1.2,localASnumber64512
BGPtableversionis1,mainroutingtableversion1
Neighbor V ASMsgRcvdMsgSent TblVer InQOutQUp/Down State/PfxRcd
10.1.1.5 464512 135 130 1 0 001:
49:
14 0
9.激活两台PE路由器MP-BGP协议,其目的是用于交换不同VPNCE上的路由
R2(config)#routerbgp64512
R2(config-router)#address-familyvpnv4//要启用MP-BGP协议,必须在VPNV4的地址簇下激活
R2(config-router-af)#neighbor10.1.1.5activate //用于激活MP-BGP邻居的路由交换
R2(config-router-af)#neighbor10.1.1.5send-communityextended//启用BGP扩展共用体交换
R2(config-router-af)#noauto-summary
R5(config)#routerbgp64512
R5(config-router)#address-familyvpnv4
R5(config-router-af)#neighbor10.1.1.2 activate
R5(config-router-af)#neighbor10.1.1.2 send-communityextended
R5(config-router-af)#noauto-summary
启用扩展共用体交换的目的是,为了MP-BGP携带RD和起源场点属性。
10.查看R2或者R5的MP-BGP协议状态,发现现在并没有相关路由
R2#showipbgpvpnv4all
11.配置VRF,实质是配置RT和RD
R2:
ipvrfmicrosoft_vpn
rd64512:
100
route-targetexport64512:
100
route-targetimport64512:
100
R5:
ipvrfmicrosoft_vpn
rd64512:
100
route-targetexport64512:
100
route-targetimport64512:
100
12.分别在R2与R5路由器上配置vrf与接口的关联性
R2(config)#intf0/0
R2(config-if)#ipvrfforwardingmicrosoft_vpn//将vrf与接口关联起来
%InterfaceF0/0IPaddress192.168.1.2removedduetoenablingVRFmicrosoft_vpn
R2(config-if)#ipadd192.168.1.2255.255.255.0
配置vrf与接口关联,会使接口IP丢失,重新配置一次就好
R5(config)#intf0/1
R5(config-if)#ipvrfforwardingmicrosoft_vpn//将vrf与接口关联起来
%InterfaceF0/1IPaddress192.168.4.1 removedduetoenablingVRFmicrosoft_vpn
R5(config-if)#ipadd192.168.4.1 255.255.255.0
13.确认vrf详细信息
showipvrf
14.配置PE和CE之间的路由选择协议和MP-BGP与RIP之间的路由重分发.
目前需要配置R2和R1,R5和R6之间
R1:
routerrip
version2
redistributestatic
network192.168.1.0
network192.168.2.0
network192.168.3.0
iproute192.168.2.0255.255.255.0Null0
iproute192.168.3.0255.255.255.0Null0
R6:
routerrip
version2
redistributestatic
network192.168.4.0
network192.168.5.0
network192.168.6.0
iproute192.168.5.0255.255.255.0Null0
iproute192.168.6.0255.255.255.0Null0
然后再配置PE端的RIP路由
R2(config)#routerrip
R2(config-router)#version2
R2(config-router)#address-familyipv4vrfmicrosoft_vpn
启用ipv4地址家族,配置rip与vrf转发表之间的关系
R2(config-router-af)#version2
R2(config-router-af)#redistributebgp64512metrictransparent
将MP-BGP中带有64512:
100的RT路由重分布到rip中,transparent的关键字是为保留RIP的原始的度量值。
他们是被复制在MED属性中的
R2(config-router-af)#network192.168.1.0
R2(config-router-af)#noauto-summary
R5(config)#routerrip
R5(config-router)#version2
R5(config-router)# address-familyipv4vrfmicrosoft_vpn
R5(config-router-af)#version2
R5(config-router-af)#network192.168.4.0
R5(config-router-af)#redistributebgp64512metrictransparent
R5(config-router-af)#noauto-summary
然后再配置BGP,确保RIP路由重分布到MP-BGP中
R2(config)#routerbgp64512
R2(config-router)#address-familyipv4vrfmicrosoft_vpn
R2(config-router-af)#redistributerip
R2(config-router-af)#noauto-summary
R2(config-router-af)#nosynchronization
R2(config-router-af)#exit
R5(config)#routerbgp64512
R5(config-router)#address-familyipv4vrfmicrosoft_vpn
R5(config-router-af)#redistributerip
R5(config-router-af)#noauto-summary
R5(config-router-af)#nosynchronization
R5(config-router-af)#exit
15.查看microsoft_vpn中的R1、R6路由表,确认MPLSVPN配置
R1#showiprouterip
R 192.168.4.0/24[120/1]via192.168.1.2,00:
00:
13,FastEthernet0/0
R 192.168.5.0/24[120/2]via192.168.1.2,00:
00:
13,FastEthernet0/0
R 192.168.6.0/24[120/2]via192.168.1.2,00:
00:
13,FastEthernet0/0
R6#showiprouterip
R 192.168.1.0/24[120/1]via192.168.4.1,00:
00:
17,FastEthernet0/0
R 192.168.2.0/24[120/2]via192.168.4.1,00:
00:
17,FastEthernet0/0
R 192.168.3.0/24[120/2]via192.168.4.1,00:
00:
17,FastEthernet0/0
16.ping确认路由的有效性
R1#ping192.168.4.2
Typeescapesequencetoabort.
Sending5,100-byteICMPEchosto192.168.4.2,timeoutis2seconds:
!
!
!
!
!
Successrateis100percent(5/5),round-tripmin/avg/max=112/193/288ms
R6#ping192.168.1.1
Typeescapesequencetoabort.
Sending5,100-byteICMPEchosto192.168.1.1,timeoutis2seconds:
!
!
!
!
!
Successrateis100percent(5/5),round-tripmin/avg/max=104/224/360ms
17。
查看MP-BGP关于vrf的路由信息
R2# showipbgpvpnv4vrfmicrosoft_vpn
BGPtableversionis19,localrouterIDis10.1.1.2
Network NextHop MetricLocPrfWeightPath
RouteDistinguisher:
64512:
100(defaultforvrfmicrosoft_vpn)
*>192.168.1.0 0.0.0.0 0 32768?
*>192.168.2.0 192.168.1.1 1 32768?
*>192.168.3.0 192.168.1.1 1 32768?
*>i192.168.4.0 10.1.1.5 0 100 0?
*>i192.168.5.0 10.1.1.5 1 100 0?
*>i192.168.6.0 10.1.1.5 1 100 0?
已学到远端192.16.8.4/5/6.0/24路由
 升级会员
升级会员 