CorelDRAW Photoshop木吉他立体效果.docx
《CorelDRAW Photoshop木吉他立体效果.docx》由会员分享,可在线阅读,更多相关《CorelDRAW Photoshop木吉他立体效果.docx(35页珍藏版)》请在冰豆网上搜索。
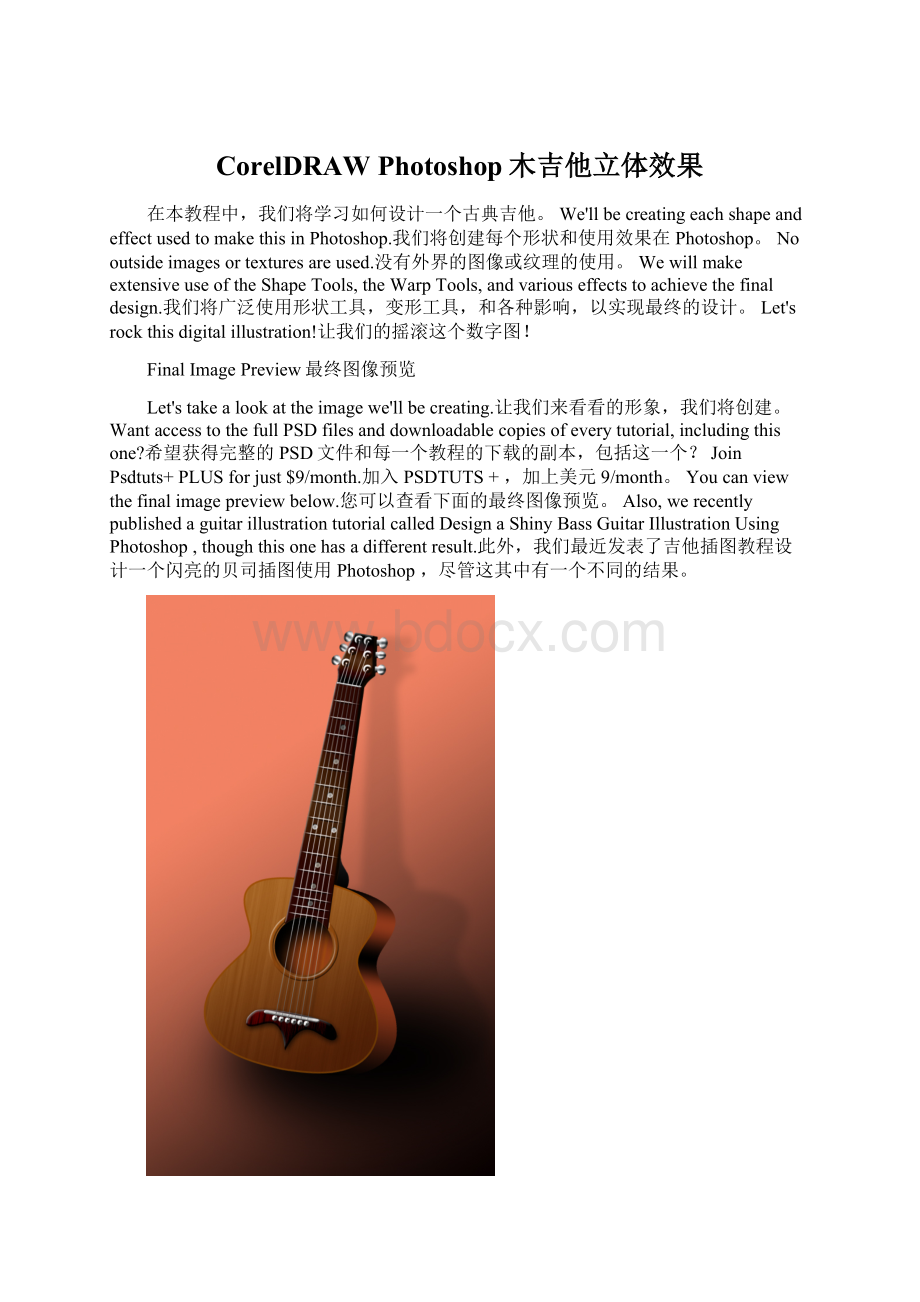
CorelDRAWPhotoshop木吉他立体效果
在本教程中,我们将学习如何设计一个古典吉他。
We'llbecreatingeachshapeandeffectusedtomakethisinPhotoshop.我们将创建每个形状和使用效果在Photoshop。
Nooutsideimagesortexturesareused.没有外界的图像或纹理的使用。
WewillmakeextensiveuseoftheShapeTools,theWarpTools,andvariouseffectstoachievethefinaldesign.我们将广泛使用形状工具,变形工具,和各种影响,以实现最终的设计。
Let'srockthisdigitalillustration!
让我们的摇滚这个数字图!
FinalImagePreview最终图像预览
Let'stakealookattheimagewe'llbecreating.让我们来看看的形象,我们将创建。
WantaccesstothefullPSDfilesanddownloadablecopiesofeverytutorial,includingthisone?
希望获得完整的PSD文件和每一个教程的下载的副本,包括这一个?
JoinPsdtuts+PLUSforjust$9/month.加入PSDTUTS+,加上美元9/month。
Youcanviewthefinalimagepreviewbelow.您可以查看下面的最终图像预览。
Also,werecentlypublishedaguitarillustrationtutorialcalledDesignaShinyBassGuitarIllustrationUsingPhotoshop,thoughthisonehasadifferentresult.此外,我们最近发表了吉他插图教程设计一个闪亮的贝司插图使用Photoshop,尽管这其中有一个不同的结果。
Step1第1步
Createanewdocumentwithawidthof600pxandheightof1000px.创建一个宽度600px建议和高度的1000px的新文件。
Settheresolutionto100andBackgroundcontentstoWhite.设置分辨率为100和背景内容为白色。
Fillthe"Background"layerwith#dbdbdb.#dbdbdb填写“背景”层。
Dragonehorizontalandoneverticalguidetothecenterofthecanvas.拖动一个水平和一个垂直引导画布的中心。
PressDtoloadthedefaultforegroundandbackgroundcolors.按D加载默认的前景色和背景色。
GrabtheEllipseTool(U),opentheGeometryOptionswindow,SelectFixedSize,thensetthewidthandheightto200,andturnonFromCenter.抓斗的椭圆工具(U),打开“几何体选项”窗口,选择固定大小,然后设置宽度和高度为200,从中心转。
Alt-clickexactlyontheIntersectionoftheguides.请按住Alt键完全指南的交集。
Acircleshapeisformed.形成一个圆的形状。
Nowdragtwohorizontalandtwoverticalguides,andsnapthemtothecircle.现在将两横两纵的指南,和捕捉他们的圈子。
TheseguideswillhelpyoutounderstandthescalethatIusewhilewarpingourcircleintotheGuitar'sbodyshape.这些指南将帮助你理解,我使用的规模,而翘曲我们圈到吉他的体形。
Step2第2步
GotoEdit>Transform>Warp,andwarpthecircleasshownbelow,thenapplyit.转到编辑>变换>扭曲和变形的圆圈,如下图所示,然后将其应用。
Playarounduntilyouaresatisfiedwiththeshapeyouget.玩耍,直到你满意你的形状。
Now,rasterizetheShape(Layers>Rasterize>Shape).现在,栅格化形状(图层>栅格化>形状)。
Changethenameofthelayerto"Body."更改层的名称,“身体”。
PressCommand+Tandcheckthedimensionsofourimage.按Command+T和检查我们的形象的尺寸。
Transformyourshapetomatchthedimensionsshownbelow.变换的形状匹配下图所示的尺寸。
Irecommendyoutodoso,tomaintainthescaleandperspectiveusedinthistutorial.我建议你这样做,以保持本教程中使用的规模和角度。
Duplicatethe"Body"layertothe"Rib"andhidethislayer.“肋骨”重复的“身体”图层隐藏这一层。
Wewillbeusingthislater.我们将使用这个版本。
Step3第3步
Movethe"Body"Layertothetop.“身体”图层移动到顶部。
Changetheforegroundcolorto#ac6c2candbackgroundcolorto#975415.更改前景色为#ac6c2c和背景颜色为#975415。
GotoFilters>Render>FibersandchangetheVarianceto4andStrengthto64,thenclickOK.转到滤镜>渲染>纤维和变化的方差4和强度为64,然后单击确定。
Changetheforegroundcolorto#683604andbackgroundcolorto#9f5007.更改为#683604的前景色和背景色#9f5007。
ApplyaGradientOverlaywiththegradientsettoForegroundtoTransparentandusethevaluesshownbelow.应用梯度设置到前台到透明的渐变叠加和使用如下所示的值。
ApplyastrokewithafilltypeofGradientandGradientsettoForegroundtoBackground,withthevaluesshownbelow.前台后台应用的梯度和梯度设置填充类型的中风,用下面所示的值。
Step4第4步
Nowunhidethe"Rib"layerandmoveit35pxright.现在,取消隐藏“肋骨”层和移动35px权利。
ChangetheForegroundcolorto#90381a.更改前景色为#90381a。
Command-clickonthelayericontoloadtheselection.点击层的图标命令加载的选择。
FilltheselectionwithaForegroundcolor.前景色填充选区。
NowgotoFilters>Noise>AddNoise.现在去>杂色>添加杂色过滤器。
Settheamountto8andclickOK.设置的数量为8,然后单击“确定”。
ApplyaGradientOverlaywiththesettingsshownbelow.应用图所示设置渐变叠加。
Step5第5步
Createanewlayeratthetopandnameit"Rosette."创建一个新层的顶部,并将它命名为“玫瑰花星级。
”GettheElipticalMarqueeTool(M),setthestyletoFixedSize,andsetbothWidthandHeightto100px.Eliptical选框工具(M),设置固定大小的风格,宽度和高度设置为100px。
Alt-clickonthecenter,thenfilltheselectionwiththeforegroundcolor#90381a.请按住Alt键的中心,然后填写与选择的前景色#90381a。
PressCommand+Dtodeselect.按Command+D取消选择。
PicktheMoveTool(V),andpresstheUpArrowKeyfivetimes,whileholdingtheShiftkeytomovethe"Rosette"layer50pxup.选择移动工具(V),按向上箭头键五次,同时按住Shift键移动“Rosette奖”层50像素。
SwaptheforegroundandBackgroundcolors.交换前景色和背景色。
Next,renderFiberswithavarianceof4andstrengthsetto64.下一步,使纤维与4方差和强度设置到64。
ApplyanInnerShadowwiththesettingsshownbelow.应用图所示设置内阴影。
Step6第6步
Createanewlayernameit"R_Ring."创建一个新层的名称“R_Ring。
”GettheElipticalMarqueetool.获取Eliptical选框工具。
Thistimefixtheheightandwidthto120px.这一次修正,以120px的高度和宽度。
Alt-clickinthecenter.请按住Alt键在中心。
Changetheforegroundcolorto#ffe47c.更改前景色为#ffe47c。
Filltheselectionwiththeforegroundcolor.前景色填充选区。
Again,gettheELipticalMarqueeTool,fixtheheightandwidthto105.同样,ELiptical选框工具,固定的高度和宽度为105。
Alt-clickinthecenterandhitDelete.请按住Alt键的中心,并按下删除。
Movethe"R_Ring"layer50pxup.移动“R_Ring”层50像素。
SettheLayerBlendingModetoSoftLight.设置图层混合模式为柔光。
GotoLayerStylesandApplyBevel&Embosswiththesettingsshownbelow.转到图层样式和应用斜角和浮雕图所示的设置。
Step7第7步
Let'screatethebridgenext.让我们创建桥旁边。
Createanewlayerandandnameit"Bridge."创建一个新层,并将它命名为“桥”。
“PickthePolygonTool(U),thenchangethesidesto3andcolortoblack.选择“多边形工具(U),然后改变双方3和颜色为黑色。
DrawaRectangleasshownbelowGotoEdit>TransformPath>Warp,andmoldtheshapeintosomethingasshownbelow,thenapplyit.绘制一个矩形,如下图所示去编辑>变换路径>经线,并塑造成什么形状,如下图所示,然后将其应用。
Youcantakeanybasicshapeandtransformitintoanycomplexshapeyouneed,justmaintaintheperspective.您可以采取任何的基本形状,并转换成你需要的任何形状复杂,只是维持的角度。
UsingtheMoveTool,movethe"Bridge"tosnapittotheguidesasshown.使用移动工具,移动的“桥梁”,捕捉到如图所示的指南。
ChangetheForegroundcolorto#90381aandbackgroundto#ac6c2c,GotoFilters>Render>Fibers,andapplyfiberswithavarianceof8andstrengthof64.更改前景色为#90381a和背景#ac6c2c,使用滤镜>渲染>纤维,以及适用于纤维与方差为8和64的力量。
SettheLayerBlendingModetoColorBurn.设置图层混合模式为颜色加深。
ApplyaBevel&Emboss.应用斜面和浮雕。
Createanewlayerandnameit"Bridge1."创建一个新层,并将它命名为“Bridge1。
”
Setforegroundcolorto#dcad9d.设置前景色为#dcad9d。
Command-clickthe"Bridge"layericontomakeaselection.命令单击“桥梁”层图标进行选择。
GotoSelect>Modify>Contract,andsetthevalueto3px,thenclickOK.去选择>修改>收缩,并将其值设置到3px,然后单击确定。
Filltheselectionwiththeforegroundcolor,setthelayerBlendingModetoSoftLightanddeselect.前景色填充选区,设置图层混合模式为柔光,然后取消选择。
ApplyaDropShadowtothe"Bridge"layerwiththesettingsshownbelow.图所示的设置的“桥梁”与层阴影。
Step8第8步
Now,let'smakethesaddle.现在,让我们的马鞍。
Makeanewlayernameit"Saddle."创建一个新层它命名为“马鞍”。
Settheforegroundcolortowhiteand设置前景色为白色,
backgroundcolorto#807f7e.背景颜色为#807f7e。
PicktheRoundedRectangleTool.选取圆角矩形工具。
OpentheGeometryoptions,selectFixedsize,thensetthewidthto63pxandheightto487px.打开几何选项,选择固定大小,然后设置宽度为63px和高度487px。
ClicksomewhereontheCanvasandrasterizethelayer.在画布上和栅格层的某处。
Renderfiberswithavarianceof14andstrengthof64.渲染6414方差和强度纤维。
PressCommand+T,Rotatetheimageto90degrees,andmovetheimagetothecenter.按Command+T键,图像旋转90度,和移动图像的中心。
ChangethevaluesforHorizontalScaleandVerticalScaleto20%and10%respectively,thenpressEntertwotimes.更改水平比例和垂直比例分别为20%和10%的值,然后按ENTER键两次。
Movetheshapeoverthe"Bridge"layer.移动的“桥梁”层的形状。
ApplyBevel&Embosswiththesettingsshownbelow.应用斜角和浮雕图所示的设置。
Step9第9步
Nowwewillmakethenuts.现在,我们将螺母。
Createanewlayerandnameit"Nut1"PickuptheEllipseTool.创建一个新层,并将其命名为“Nut1”,拿起椭圆工具。
OpentheGeometryOptionswindow,thenchangethewidthandheightto20px.打开“几何体选项”窗口,然后更改宽度和高度为20px。
Clickanywhereonthecanvas.在画布上的任意位置单击。
ApplyBevel&EmbossandContourwiththevaluesshownbelow.应用斜角和浮雕和轮廓图所示的值。
Settheforegroundcolortoblack.设置前景色为黑色。
PickuptheBrushtoolandsetthediameterto5px.拿起画笔工具,设置直径为5px。
ClickonceinthemiddleoftheCircle.在中间的圆圈,点击一次。
Command+Ton"Nut1."命令+的“T”Nut1。
Enter50%forbothHorizontalandVerticalScaleandapplyit.输入50%的水平和垂直缩放,并应用它。
Duplicatethe"Nut1"layerfivetimesandnamethem"Nut2,""Nut3,"andsoon.重复五次“Nut1”层和他们的名字“Nut2”,“Nut3,”等。
Moveeach"Nut"layertoalignthemasshownbelow.将每个“螺母”层对齐它们,如下图所示。
Step10第10步
Let'screatetheneckoftheguitarnext.让我们创建的脖子旁边的吉他。
First,letsmoveallthelayersdown.首先,让我们将所有层。
HolddowntheShiftkeyandselectallthelayersexceptthebackground.按住Shift键并选中除背景层。
PickuptheMovetool.拿起移动工具。
HolddowntheShiftkeyandpresstheDownArrowseventeentimestomoveeverything170pxdown.按住Shift键,然后按向下箭头十七次移动一切170px。
Iremovedalltheguides.我删除了所有的指南。
PressDtoloaddefaultforegroundandbackgroundcolors.按D加载默认的前景色和背景色。
Nowmakeanewlayerandnameit"Neck."现在创建一个新层,并将它命名为“领。
”
PickuptheRectangleTool.拿起矩形工具。
OpentheGeometryoptionsandsetthewidthto75pxandheightto425px.打开“几何体选项,并设置宽度为75px和高度425px。
Clickonthecanvasandplacetherectangleasshown.点击在画布上放置矩形,如图所示。
GotoEdit>Transform>PerspectiveanddragthetoprightcorneroftheRectangleapproximately10pxtotheleft.转到编辑>变换>透视,并拖动左侧约10px的矩形的右上角。
Rasterizethelayer,thensettheforegroundcolorto#875545andbackgroundcolorto#48260d.栅格化图层,然后设置前景色为#875545和背景颜色为#48260d。
RenderfiberswithaVarianceof1andStrengthof64.渲染1的方差和64强度的纤维。
Step11第11步
Nowduplicatethe"Neck"layerandnameitas"Heel."现在重复的“脖子”图层,并命名为“脚跟。
”Whilethe"Heel"layerishighlightedCommand-clickthe"Body"layer.虽然“鞋跟”层是突出显示的命令,单击“身体”图层。
PresstheUpArrowbuttonthreetimestomovetheselection3pxup.按向上箭头键三次,移动选择3px。
HittheDeletekey.按下删除键。
NowgotoFilter>Liquify.现在去滤镜>液化。
ChoosetheForwardWarpTool(W),andmanipulatetheimageasshownbelow.选择“向前变形工具(W),并处理图像,如下图所示。
PressOKandreturntothemainwindow.按OK返回到主窗口。
Placethe"Heel"layerbelow
 升级会员
升级会员 