SSM框架的配置和实现.docx
《SSM框架的配置和实现.docx》由会员分享,可在线阅读,更多相关《SSM框架的配置和实现.docx(16页珍藏版)》请在冰豆网上搜索。
SSM框架的配置和实现
SSM框架的配置和登录功能demo的实现
1.SSM配置
1.1配置环境
Eclipse版本:
MyEclipseEnterprise2015Stable2.0
JDK版本:
jdk1.7.0_15
Spring版本:
spring3.1
Struts版本:
Struts2
Mybatis版本:
Mybatis3.1
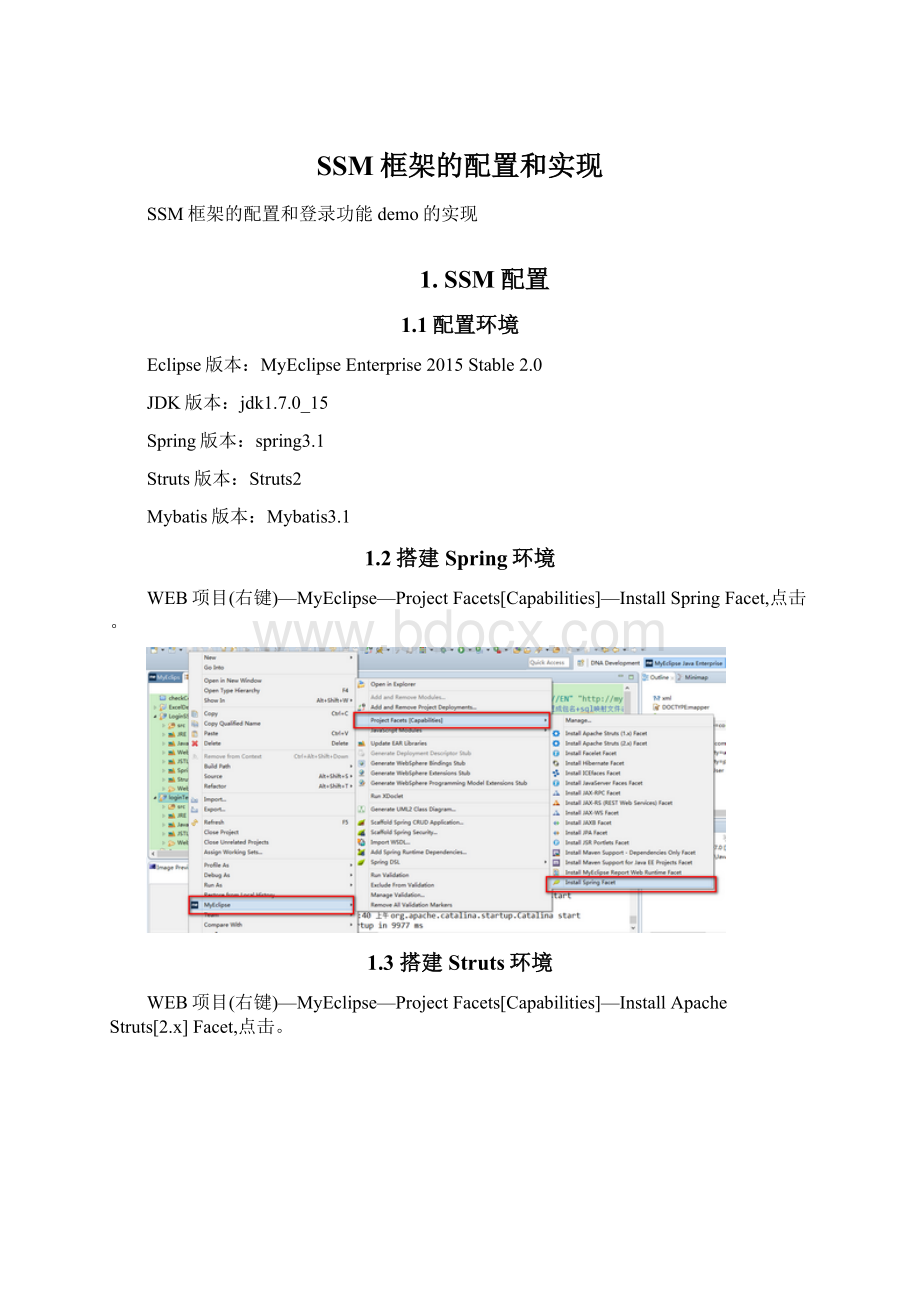
1.2搭建Spring环境
WEB项目(右键)—MyEclipse—ProjectFacets[Capabilities]—InstallSpringFacet,点击。
1.3搭建Struts环境
WEB项目(右键)—MyEclipse—ProjectFacets[Capabilities]—InstallApacheStruts[2.x]Facet,点击。
1.4引入jar包
jar文件放入lib文件夹中。
1.5配置applicationContext.xml
xmlversion="1.0"encoding="UTF-8"?
>
//www.springframework.org/schema/beans"
xmlns:
xsi="http:
//www.w3.org/2001/XMLSchema-instance"xmlns:
p="http:
//www.springframework.org/schema/p"
xmlns:
context="http:
//www.springframework.org/schema/context"
xmlns:
mvc="http:
//www.springframework.org/schema/mvc"
xsi:
schemaLocation="http:
//www.springframework.org/schema/beans
http:
//www.springframework.org/schema/beans/spring-beans-3.1.xsd
http:
//www.springframework.org/schema/context
http:
//www.springframework.org/schema/context/spring-context-3.1.xsd
http:
//www.springframework.org/schema/mvc
http:
//www.springframework.org/schema/mvc/spring-mvc-4.0.xsd">
--自动扫描com.entity包下面和子包下面的注解并且执行-->
component-scanbase-package="com"/>
--引入配置文件-->
class="org.springframework.beans.factory.config.PropertyPlaceholderConfigurer">
destroy-method="close">
oracle:
thin:
@localhost:
1521:
orcl"/>
--初始化连接大小-->
--连接池最大数量-->
--连接池最大空闲-->
--连接池最小空闲-->
--获取连接最大等待时间-->
1.6测试配置进度
项目(右键)—RunAs—MyEclipseServerApplication–点击服务器---Finish。
页面自动弹出index.jsp页面。
1.7调整显示浏览器
将浏览器设置为自己的浏览器,可new一个自己的浏览器。
1.8调整jsp显示编码方式
设置jsp页面的默认编码格式为UTF-8
2SSM登录功能实现DEMO
2.0数据库设计
2.1登录页面代码
2.2struts.xml文件配置
1.4loginAction代码
这一步需要注意jsp页面的变量需要在Action中属性私有化,调用格式为变量名+属性名,例name=”user.userName”
2.4biz层代码
biz接口层代码
实现类代码
2.5dao层代码
dao接口层代码
实现类代码
bean(实体)层代码
2.6Mapper文件
xmlversion="1.0"encoding="UTF-8"?
>
DOCTYPEmapperPUBLIC"-//mybatis.org//DTDMapper3.0//EN""http:
//mybatis.org/dtd/mybatis-3-mapper.dtd">
--为这个mapper指定一个唯一的namespace,namespace的值习惯上设置成包名+sql映射文件名,这样就能够保证namespace的值是唯一的
例如namespace="org.mapping.stuMapper"就是org.mapping(包名)+stuMapper(stuMapper.xml文件去除后缀)
-->
--查找所有用户-->
select*fromLOGIN
2.7配置applicationContext.xml
--spring和MyBatis完美整合,不需要mybatis的配置映射文件-->
--自动扫描mapping.xml文件-->
com/entity/*.xml">
--DAO接口所在包名,Spring会自动查找其下的类-->
--(事务管理)transactionmanager,useJtaTransactionManagerforglobaltx-->
class="org.springframework.jdbc.datasource.DataSourceTransactionManager">
factory-method="openSession">
2.8登录成功和登录失败页面
登录失败和登录成功我只写了一个小提示用来测试功能。
2.9测试登录功能
2.9目录结构
 升级会员
升级会员 