你需要知道的Android View的创建.docx
《你需要知道的Android View的创建.docx》由会员分享,可在线阅读,更多相关《你需要知道的Android View的创建.docx(17页珍藏版)》请在冰豆网上搜索。
你需要知道的AndroidView的创建
你需要知道的AndroidView的创建
View的创建与绘制一向是很多人望而止步的问题。
然而我们在平常的应用开发中是最经常运用到的setContentView(),我们都会用在Activity的onCreate()的时候调用setContentView()来加载编辑好的XML布局。
但是实际上创建与绘制一个View,内部的实现方式的确比我们表面所编写的代码复杂得多,导致大家没能深入去了解View的创建与绘制。
接下来我们一步步来了解View的创建与绘制。
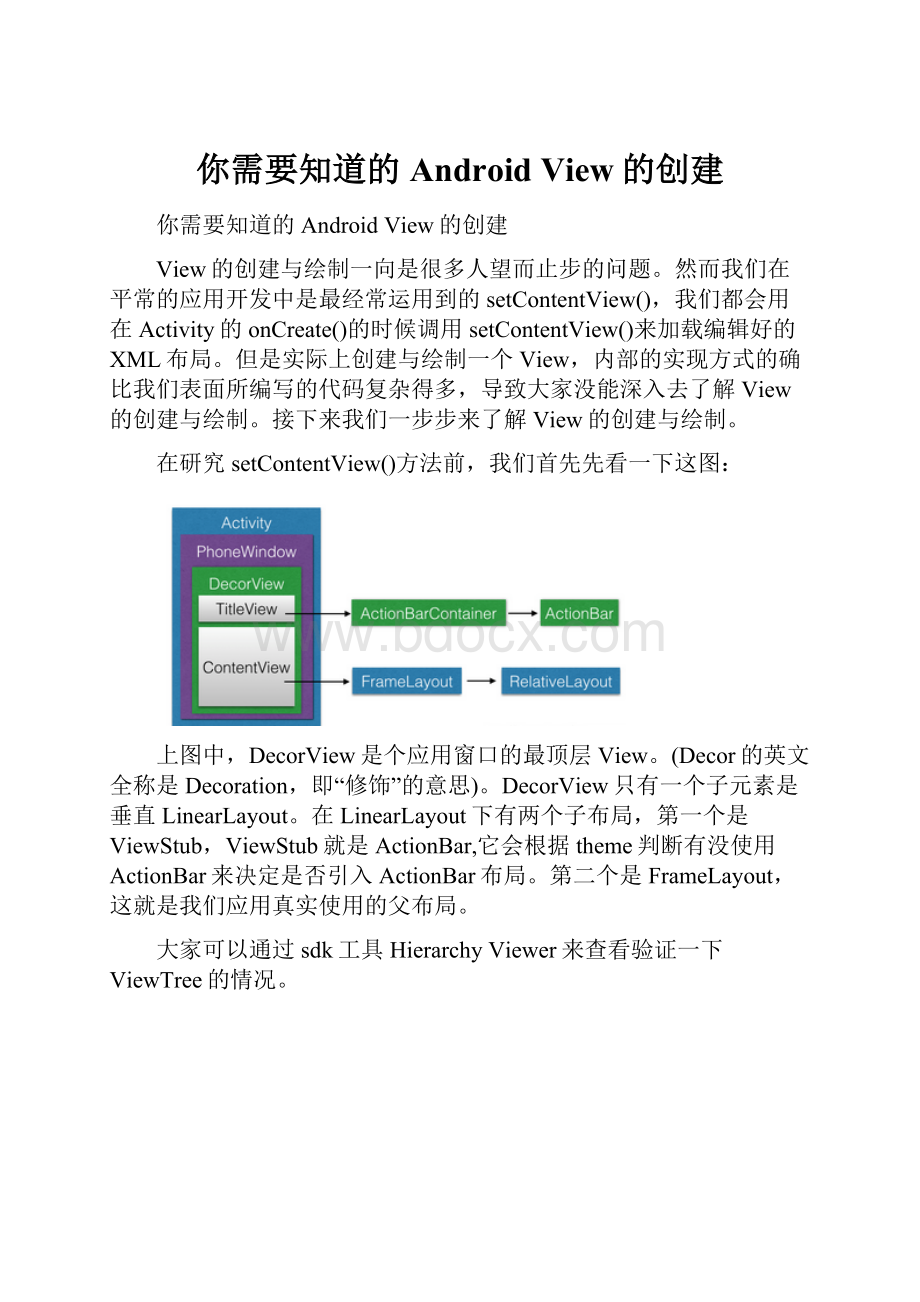
在研究setContentView()方法前,我们首先先看一下这图:
上图中,DecorView是个应用窗口的最顶层View。
(Decor的英文全称是Decoration,即“修饰”的意思)。
DecorView只有一个子元素是垂直LinearLayout。
在LinearLayout下有两个子布局,第一个是ViewStub,ViewStub就是ActionBar,它会根据theme判断有没使用ActionBar来决定是否引入ActionBar布局。
第二个是FrameLayout,这就是我们应用真实使用的父布局。
大家可以通过sdk工具HierarchyViewer来查看验证一下ViewTree的情况。
Window,中文解析“窗口”。
它是一个宏观的概念。
该类是一个抽象类,提供了绘制窗口的通用API,我们可以理解为它是一个载体。
接着我们看一下PhoneWindow,它是Android中Window的具体实现类。
PhoneWindow位于/frameworks/policies/base/phone/com/android/internal/policy/impl/PhoneWindow.java
PhoneWindow继承于Window类,我们可以通过实现具体抽象方法去绘制窗口,该类还包含DecorView内部类。
我们平时调用的setContentView()方法设置Activity的用户界面时,实际上是对PhoneWindow的ViewTree的设置。
我们通过一个比喻来理解他们之间的关系。
Window类相当于一幅画(抽象概念,什么画我们未知),PhoneWindow为一副齐白石先生的山水画(具体概念,我们知道了是谁的、什么性质的画),DecorView则为该山水画的具体内容(有山、有水、有树,各种界面)。
DecorView呈现在PhoneWindow上。
好了,有了这部分的认识之后,我们就开始从源码的角度去认识View的创建。
当我们自定义Activity继承Android.app.Activity时候,调用的setContentView()如下:
publicvoidsetContentView(@LayoutResintlayoutResID){
getWindow().setContentView(layoutResID);
initWindowDecorActionBar();
}
getWindow()方法返回一个PhoneWindow对象,那就是说调用的是PhoneWindow的setContentView()方法。
源码如下:
@Override
publicvoidsetContentView(intlayoutResID){
//Note:
FEATURE_CONTENT_TRANSITIONSmaybesetintheprocessofinstallingthewindow
//decor,whenthemeattributesandthelikearecrystalized.Donotcheckthefeature
//beforethishappens.
if(mContentParent==null){
//mContentParent即为上面提到的ContentView的父容器,若为空则调用installDecor()生成
installDecor();
}elseif(!
hasFeature(FEATURE_CONTENT_TRANSITIONS)){
//mContentParent不为null,则移除decorView的所有子View
mContentParent.removeAllViews();
}
if(hasFeature(FEATURE_CONTENT_TRANSITIONS)){
finalScenenewScene=Scene.getSceneForLayout(mContentParent,layoutResID,
getContext());
transitionTo(newScene);
}else{
//一般情况会来到这里,调用mLayoutInflater.inflate()方法来填充布局
//填充布局也就是把我们设置的ContentView加入到mContentParent中
mLayoutInflater.inflate(layoutResID,mContentParent);//2
}
finalCallbackcb=getCallback();
if(cb!
=null&&!
isDestroyed()){
//调用onContentChanged()回调方法通知Activity窗口内容发生了改变
cb.onContentChanged();
}
}
首先判断了mContentParent是否为null,如果为空则执行installDecor()方法,那么这个mContentParent又是什么呢?
我们看一下它的注释。
//Thisistheviewinwhichthewindowcontentsareplaced.Itiseither
//mDecoritself,orachildofmDecorwherethecontentsgo.
privateViewGroupmContentParent;
它是一个ViewGroup类型,结合2处代码,可以得知,这个mContentParent是我们设置的布局的父布局。
梳理下:
Activity通过PhoneWindow的setContentView方法来设置布局,而设置布局之前,会先判断是否存在mContentParent,而我们设置的布局文件则是mContentParent的子元素。
接着我们看一下installDecor(),我们看一下PhoneWindow#installDecor:
privatevoidinstallDecor(){
if(mDecor==null){
mDecor=generateDecor();//1
mDecor.setDescendantFocusability(ViewGroup.FOCUS_AFTER_DESCENDANTS);
mDecor.setIsRootNamespace(true);
if(!
mInvalidatePanelMenuPosted&&mInvalidatePanelMenuFeatures!
=0){
mDecor.postOnAnimation(mInvalidatePanelMenuRunnable);
}
}
if(mContentParent==null){
mContentParent=generateLayout(mDecor);//2
...
}
}
}
首先,会执行1处代码,调用PhoneWindow#generateDecor方法:
protectedDecorViewgenerateDecor(){
returnnewDecorView(getContext(),-1);
}
可以看出,这里实例化了DecorView,而DecorView则是PhoneWindow类的一个内部类,继承于FrameLayout,由此可知它也是一个ViewGroup。
DecorView上面我们已经对它进行过一次解析了,大家可以返回去回顾下。
接下来我们看2处PhoneWindow#generateLayout方法的代码:
protectedViewGroupgenerateLayout(DecorViewdecor){
//Applydatafromcurrenttheme.
//从主题文件中获取样式信息
//加载TitleBar方法一
TypedArraya=getWindowStyle();
...
if(a.getBoolean(R.styleable.Window_windowNoTitle,false)){
requestFeature(FEATURE_NO_TITLE);
}elseif(a.getBoolean(R.styleable.Window_windowActionBar,false)){
//Don'tallowanactionbarifthereisnotitle.
requestFeature(FEATURE_ACTION_BAR);
}
if(...){
...
}
//Inflatethewindowdecor.
//加载窗口布局
intlayoutResource;
//加载TitleBar方法二
intfeatures=getLocalFeatures();
//System.out.println("Features:
0x"+Integer.toHexString(features));
if((features&(1<=0){
layoutResource=R.layout.screen_swipe_dismiss;
}elseif(...){
...
}
Viewin=mLayoutInflater.inflate(layoutResource,null);//加载layoutResource
decor.addView(in,newViewGroup.LayoutParams(MATCH_PARENT,MATCH_PARENT));//往DecorView中添加子View,即mContentParent
mContentRoot=(ViewGroup)in;
ViewGroupcontentParent=(ViewGroup)findViewById(ID_ANDROID_CONTENT);//这里获取的就是mContentParent
if(contentParent==null){
thrownewRuntimeException("Windowcouldn'tfindcontentcontainerview");
}
if((features&(1<=0){
ProgressBarprogress=getCircularProgressBar(false);
if(progress!
=null){
progress.setIndeterminate(true);
}
}
if((features&(1<=0){
registerSwipeCallbacks();
}
//Remainingsetup--ofbackgroundandtitle--thatonlyapplies
//totop-levelwindows.
...
returncontentParent;
}
由以上代码可以看出,该方法还是做了相当多的工作的,首先根据设置的主题样式来设置DecorView的风格,比如说有没有titlebar之类的,就是解析我们为Activity设置theme的地方,至于Theme的设置:
1.我们可以在AndroidManifest里面进行设置,为我们的Activity配置相应属性,即android:
theme=”“,PhoneWindow对象调用getWindowStyle()方法获取值。
2.也可以在setContentView()前调用requestFeature,指定requestFeature()指定窗口修饰符,PhoneWindow对象调用getLocalFeature()方法获取值;
对Theme操作完,我们才对layoutResource赋值的,因此我相信有不少人都曾经遇到一个错误——“requestFeature()mustbecalledbeforeaddingcontent”。
接着通过对features和mIsFloating的判断,设置窗口的风格修饰为layoutResource进行赋值。
得到了layoutResource以后,通过LayoutInflater.inflate()方法生成View对象。
并加入到decor中。
这就是为DecorView添加子View,而这里的子View则是上面提到的mContentParent。
如果上面设置了FEATURE_NO_ACTIONBAR,那么DecorView就只有mContentParent一个子View,这也解释了mContentParent对象注释:
mContentParent是DecorView本身或者是DecorView的一个子元素。
小结:
DecorView是顶级View,内部有titlebar和contentParent两个子元素,而内部根据theme设置TitleBar,和选择系统中的布局文件,将布局文件通过inflate转化为view,加入到mDecor中;这些布局文件中都包含一个id为content的FrameLayout,将其引用返回给mContentParent。
了解完PhoneWindow#installDecor后我们接着PhoneWindow#setContentView(),看到那部分2处代码:
mLayoutInflater.inflate(layoutResID,mContentParent);相信LayoutInflater大家跟setContentView()一样常用。
因为在一些动态加载View和BaseAdapter适配器的代码编写中我们都会用到。
我们来看一下它的代码:
publicViewinflate(XmlPullParserparser,@NullableViewGrouproot){
returninflate(parser,root,root!
=null);
}
publicViewinflate(@LayoutResintresource,@NullableViewGrouproot,booleanattachToRoot){
finalResourcesres=getContext().getResources();
if(DEBUG){
Log.d(TAG,"INFLATINGfromresource:
\""+res.getResourceName(resource)+"\"("
+Integer.toHexString(resource)+")");
}
finalXmlResourceParserparser=res.getLayout(resource);
try{
returninflate(parser,root,attachToRoot);
}ally{
parser.close();
}
}
LayoutInflater.inflate()将上面创建的decorView作为root的参数。
上面的代码比较简单,重点是return那行的inflate(),我们看一下里面的实现过程:
publicViewinflate(XmlPullParserparser,@NullableViewGrouproot,booleanattachToRoot){
synchronized(mConstructorArgs){
Trace.traceBegin(Trace.TRACE_TAG_VIEW,"inflate");
finalContextinflaterContext=mContext;
finalAttributeSetattrs=Xml.asAttributeSet(parser);
ContextlastContext=(Context)mConstructorArgs[0];
mConstructorArgs[0]=inflaterContext;
Viewresult=root;
try{
//Lookfortherootnode.
inttype;
//一直读取xml文件,直到遇到开始标记
while((type=parser.next())!
=XmlPullParser.START_TAG&&
type!
=XmlPullParser.END_DOCUMENT){
//Empty
}
if(type!
=XmlPullParser.START_TAG){
thrownewInflateException(parser.getPositionDescription()
+":
Nostarttagfound!
");
}
finalStringname=parser.getName();
if(DEBUG){
System.out.println("**************************");
System.out.println("Creatingrootview:
"
+name);
System.out.println("**************************");
}
//单独处理标签
if(TAG_MERGE.equals(name)){
if(root==null||!
attachToRoot){
thrownewInflateException("canbeusedonlywithavalid"
+"ViewGrouprootandattachToRoot=true");
}
//递归地填充布局
rInflate(parser,root,inflaterContext,attrs,false);
}else{
//Tempistherootviewthatwasfoundinthexml
//能在XML发现根View
finalViewtemp=createViewFromTag(root,name,inflaterContext,attrs);
ViewGroup.LayoutParamsparams=null;
if(root!
=null){
if(DEBUG){
System.out.println("Creatingparamsfromroot:
"+
root);
}
//Createlayoutparamsthatmatchroot,ifsupplied
//获取父容器的布局参数(LayoutParams)
params=root.generateLayoutParams(attrs);
if(!
attachToRoot){
//Setthelayoutparamsfortempifwearenot
//attaching.(Ifweare,weuseaddView,below)
//若attachToRoot参数为false,则我们只会将父容器的布局参数设置给根View
temp.setLayoutParams(params);
}
}
if(DEBUG){
System.out.println("----->startinflatingchildren");
}
//Inflateallchildrenundertempagainstitscontext.
//递归加载根View的所有子View
rInflateChildren(parser,temp,attrs,true);
if(DEBUG){
System.out.println("----->doneinflatingchildren");
}
//Wearesupposedtoattachalltheviewswefound(inttemp)
//toroot.Dothatnow.
//若父容器不为空且attachToRoot为true,则将父容器作为根View的父View包裹上来
if(root!
=null&&attachToRoot){
root.addView(temp,params);
}
//Decidewhethertoreturntherootthatwaspassedinorthe
//topviewndinxml.
//若root为空或是attachToRoot为false,则以根View作为返回值
if(root==null||!
attachToRoot){
result=temp;
}
}
}catch(XmlPullParserExceptione){
InflateExceptionex=newInflateException(e.getMessage());
ex.initCause(e);
throwex;
}catch(Exceptione){
InflateExceptionex=newInflateException(
parser.getPositionDescription()
+":
"+e.getMessage());
ex.initCause(e);
throwex;
}finally{
//Don'tretainstaticreferenceoncontext.
mC
 升级会员
升级会员 