spring注释.docx
《spring注释.docx》由会员分享,可在线阅读,更多相关《spring注释.docx(29页珍藏版)》请在冰豆网上搜索。

spring注释
@Required注解适用于bean属性的setter方法并且它指示,受影响的bean属性必须在配置时被填充在XML配置文件中,否则容器将抛出BeanInitializationException例外。
下面是一个例子,说明使用@Required注解。
例子:
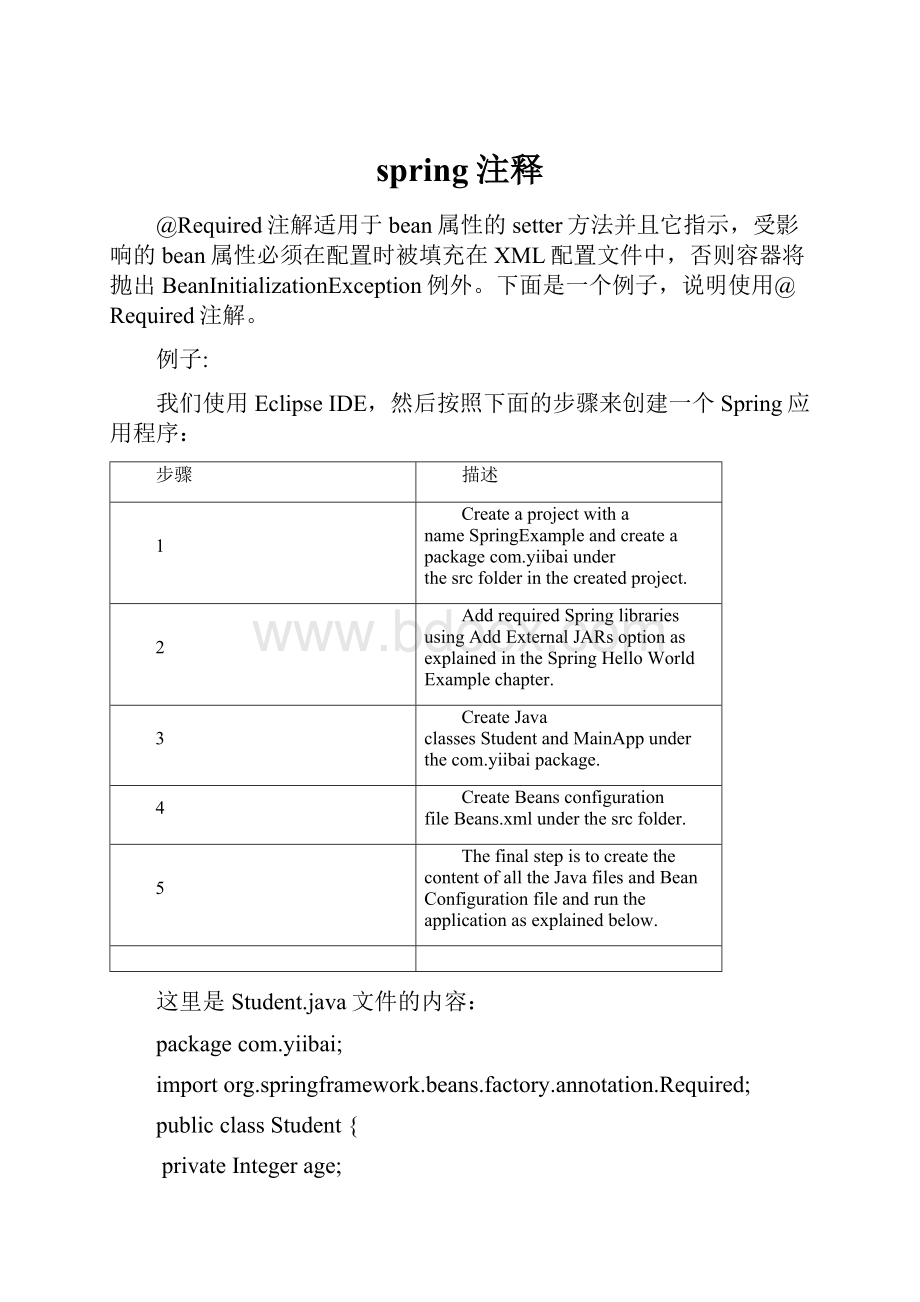
我们使用EclipseIDE,然后按照下面的步骤来创建一个Spring应用程序:
步骤
描述
1
Createaprojectwithaname SpringExample andcreateapackage com.yiibai underthe src folderinthecreatedproject.
2
AddrequiredSpringlibrariesusing AddExternalJARs optionasexplainedinthe SpringHelloWorldExample chapter.
3
CreateJavaclasses Student and MainApp underthe com.yiibai package.
4
CreateBeansconfigurationfile Beans.xml underthe src folder.
5
ThefinalstepistocreatethecontentofalltheJavafilesandBeanConfigurationfileandruntheapplicationasexplainedbelow.
这里是Student.java文件的内容:
packagecom.yiibai;
importorg.springframework.beans.factory.annotation.Required;
publicclassStudent{
privateIntegerage;
privateStringname;
@Required
publicvoidsetAge(Integerage){
this.age=age;
}
publicIntegergetAge(){
returnage;
}
@Required
publicvoidsetName(Stringname){
this.name=name;
}
publicStringgetName(){
returnname;
}
}
以下是MainApp.java文件的内容:
packagecom.yiibai;
importorg.springframework.context.ApplicationContext;
importorg.springframework.context.support.ClassPathXmlApplicationContext;
publicclassMainApp{
publicstaticvoidmain(String[]args){
ApplicationContextcontext=
newClassPathXmlApplicationContext("Beans.xml");
Studentstudent=(Student)context.getBean("student");
System.out.println("Name:
"+student.getName());
System.out.println("Age:
"+student.getAge());
}
}
以下是配置文件beans.xml中的内容:
xmlversion="1.0"encoding="UTF-8"?
>
//www.springframework.org/schema/beans"
xmlns:
xsi="http:
//www.w3.org/2001/XMLSchema-instance"
xmlns:
context="http:
//www.springframework.org/schema/context"
xsi:
schemaLocation="http:
//www.springframework.org/schema/beans
http:
//www.springframework.org/schema/beans/spring-beans-3.0.xsd
http:
//www.springframework.org/schema/context
http:
//www.springframework.org/schema/context/spring-context-3.0.xsd">
annotation-config/>
--Definitionforstudentbean-->
--trywithoutpassingageandchecktheresult-->
--propertyname="age"value="11"-->
一旦创建源代码和bean配置文件完成后,让我们运行应用程序。
如果一切顺利,这将抛出BeanInitializationException异常,并与其他日志信息打印以下错误:
Property'age'isrequiredforbean'student'
接下来,可以从“age”属性中删除注释如下尝试后,上面的例子:
xmlversion="1.0"encoding="UTF-8"?
>
//www.springframework.org/schema/beans"
xmlns:
xsi="http:
//www.w3.org/2001/XMLSchema-instance"
xmlns:
context="http:
//www.springframework.org/schema/context"
xsi:
schemaLocation="http:
//www.springframework.org/schema/beans
http:
//www.springframework.org/schema/beans/spring-beans-3.0.xsd
http:
//www.springframework.org/schema/context
http:
//www.springframework.org/schema/context/spring-context-3.0.xsd">
annotation-config/>
--Definitionforstudentbean-->
现在,上面的例子会产生以下结果:
Name:
Zara
Age:
11
@Autowired注解提供更细粒度地控制在何处以及如何使用自动装配时应完成。
@Autowired注解可以用于自动装配的bean的setter方法就像@Required注解,构造函数,属性或具有任意名称和/或多个参数的方法。
@Autowired在Setter方法:
您可以使用@Autowired注解放在setter方法来摆脱在XML配置文件中的元素。
当Spring发现setter方法使用@Autowired注解,它会尝试对方法进行byType的自动装配。
例子
我们使用EclipseIDE,然后按照下面的步骤来创建一个Spring应用程序:
步骤
描述
1
Createaprojectwithaname SpringExample andcreateapackage com.yiibai underthe src folderinthecreatedproject.
2
AddrequiredSpringlibrariesusing AddExternalJARs optionasexplainedinthe SpringHelloWorldExample chapter.
3
CreateJavaclasses TextEditor, SpellChecker and MainApp underthe com.yiibaipackage.
4
CreateBeansconfigurationfile Beans.xml underthe src folder.
5
ThefinalstepistocreatethecontentofalltheJavafilesandBeanConfigurationfileandruntheapplicationasexplainedbelow.
这里是TextEditor.java文件的内容:
packagecom.yiibai;
importorg.springframework.beans.factory.annotation.Autowired;
publicclassTextEditor{
privateSpellCheckerspellChecker;
@Autowired
publicvoidsetSpellChecker(SpellCheckerspellChecker){
this.spellChecker=spellChecker;
}
publicSpellCheckergetSpellChecker(){
returnspellChecker;
}
publicvoidspellCheck(){
spellChecker.checkSpelling();
}
}
下面是另外一个相关的类文件SpellChecker.java内容:
packagecom.yiibai;
publicclassSpellChecker{
publicSpellChecker(){
System.out.println("InsideSpellCheckerconstructor.");
}
publicvoidcheckSpelling(){
System.out.println("InsidecheckSpelling.");
}
}
以下是MainApp.java文件的内容:
packagecom.yiibai;
importorg.springframework.context.ApplicationContext;
importorg.springframework.context.support.ClassPathXmlApplicationContext;
publicclassMainApp{
publicstaticvoidmain(String[]args){
ApplicationContextcontext=
newClassPathXmlApplicationContext("Beans.xml");
TextEditorte=(TextEditor)context.getBean("textEditor");
te.spellCheck();
}
}
以下是配置文件beans.xml文件:
xmlversion="1.0"encoding="UTF-8"?
>
//www.springframework.org/schema/beans"
xmlns:
xsi="http:
//www.w3.org/2001/XMLSchema-instance"
xmlns:
context="http:
//www.springframework.org/schema/context"
xsi:
schemaLocation="http:
//www.springframework.org/schema/beans
http:
//www.springframework.org/schema/beans/spring-beans-3.0.xsd
http:
//www.springframework.org/schema/context
http:
//www.springframework.org/schema/context/spring-context-3.0.xsd">
annotation-config/>
--DefinitionfortextEditorbeanwithoutconstructor-arg-->
--DefinitionforspellCheckerbean-->
创建源代码和bean配置文件完成后,让我们运行应用程序。
如果一切顺利,将打印以下信息:
InsideSpellCheckerconstructor.
InsidecheckSpelling.
@Autowired在Properties:
您可以使用@Autowired注解的属性摆脱setter方法。
当使用通过自动装配属性的值Spring会自动分配这些属性与传递的值或引用。
因此,@Autowired上的属性的使用TextEditor.javafile将如下:
packagecom.yiibai;
importorg.springframework.beans.factory.annotation.Autowired;
publicclassTextEditor{
@Autowired
privateSpellCheckerspellChecker;
publicTextEditor(){
System.out.println("InsideTextEditorconstructor.");
}
publicSpellCheckergetSpellChecker(){
returnspellChecker;
}
publicvoidspellCheck(){
spellChecker.checkSpelling();
}
}
以下是配置文件beans.xml文件:
xmlversion="1.0"encoding="UTF-8"?
>
//www.springframework.org/schema/beans"
xmlns:
xsi="http:
//www.w3.org/2001/XMLSchema-instance"
xmlns:
context="http:
//www.springframework.org/schema/context"
xsi:
schemaLocation="http:
//www.springframework.org/schema/beans
http:
//www.springframework.org/schema/beans/spring-beans-3.0.xsd
http:
//www.springframework.org/schema/context
http:
//www.springframework.org/schema/context/spring-context-3.0.xsd">
annotation-config/>
--DefinitionfortextEditorbean-->
--DefinitionforspellCheckerbean-->
创建源代码和bean配置文件完成后,让我们运行应用程序。
如果一切顺利,将打印以下信息:
InsideTextEditorconstructor.
InsideSpellCheckerconstructor.
InsidecheckSpelling.
@Autowired在构造函数:
可以将@Autowired在构造函数中。
构造函数和@Autowired注解表明该构造函数应该在创建这个bean时,自动装配,即使在配置bean的XML文件没有元素被使用。
让我们检查下面的例子。
这里是TextEditor.java文件的内容:
packagecom.yiibai;
importorg.springframework.beans.factory.annotation.Autowired;
publicclassTextEditor{
privateSpellCheckerspellChecker;
@Autowired
publicTextEditor(SpellCheckerspellChecker){
System.out.println("InsideTextEditorconstructor.");
this.spellChecker=spellChecker;
}
publicvoidspellCheck(){
spellChecker.checkSpelling();
}
}
以下是配置文件beans.xml文件:
xmlversion="1.0"encoding="UTF-8"?
>
//www.springframework.org/schema/beans"
xmlns:
xsi="http:
//www.w3.org/2001/XMLSchema-instance"
xmlns:
context="http:
//www.springframework.org/schema/context"
xsi:
schemaLocation="http:
//www.springframework.org/schema/beans
http:
//www.springframework.org/schema/beans/spring-beans-3.0.xsd
http:
//www.springframework.org/schema/context
http:
//www.springframework.org/schema/context/spring-context-3.0.xsd">
annotation-config/>
--DefinitionfortextEditorbeanwithoutconstructor-arg-->
--DefinitionforspellCheckerbean-->
创建源代码和bean配置文件完成后,让我们运行应用程序。
如果一切顺利,将打印以下信息:
InsideTextEditorconstructor.
InsideSpellCheckerconstructor.
InsidecheckSpelling.
@Autowired与(required=false)选项
默认情况下,@Autowired注解意味着依赖关系需要类似@Required注解,但是,你可以通过使用(required=false)选项使用@Autowired的关闭的默认行为。
下面的例子将工作,即使你没有通过age属性的任何值,但它仍然会为name属性的要求。
你自己可以试试这个例子,因为这是使用@Required注解例子不同的是仅Student.java文件已被更改。
packagecom.yiibai;
importorg.springframework.beans.factory.annotation.Autowired;
publicclassStudent{
privateIntegerage;
privateStringname;
@Autowired(required=false)
publicvoidsetAge(Integerage){
this.age=age;
}
publicIntegergetAge(){
returnage;
}
@Autowired
publicvoidsetName(Stringname){
this.name=name;
}
publicStringgetName(){
returnname;
}
}
有可能是当你创建同一类型的多个bean,并希望连线只与属性其中之一,在这种情况下,你可以使用@Qualifier注解一起@Autowired的通过指定其确切的bean来去除混乱的局面将有线。
下面是一个例子,说明使用@Qualifier注解。
例子:
让我们使用EclipseIDE,然后按照下面的步骤来创建一个Spring应用程序:
步骤
描述
1
Createaprojectwithaname SpringExample andcreateapackage com.yiibai underthe src folderinthecreatedproject.
2
AddrequiredSpringlibrariesusing Add